Help: User's Guide: Custom Missions
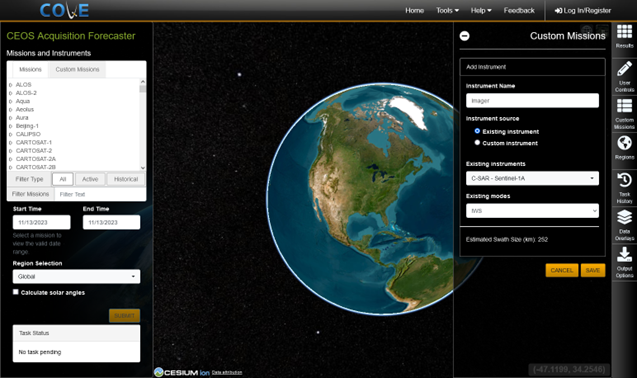
Users may create and manage custom mission from the right-side Custom Missions panel in Acquisition Forecaster, Coincident Calculator, and Revisits Calculator tools. Custom mission should be created/managed while logged into a COVE user account. If a custom mission is created while not logged in to a COVE user account, the custom mission will only temporarily be available.

Custom missions and instruments follow the same hierarchy as the primary COVE mission and instruments in that mission defines the spacecraft orbit and the instrument defines the optical parameters to create the ground swath. Instruments exist as a component of a mission since the calculation of the mean ground swath depends on the orbit of the host mission and this dependence prevents an instrument from being useful on its own within the COVE framework.
Creating Custom Missions and Instrument Combinations
Users have two basic options when creating new missions and instruments. Users may choose to either replicate an existing item from the COVE database or to specify the parameters to create a new one. Users can combine existing and custom items in any combination desired to create new mission and instrument combinations.
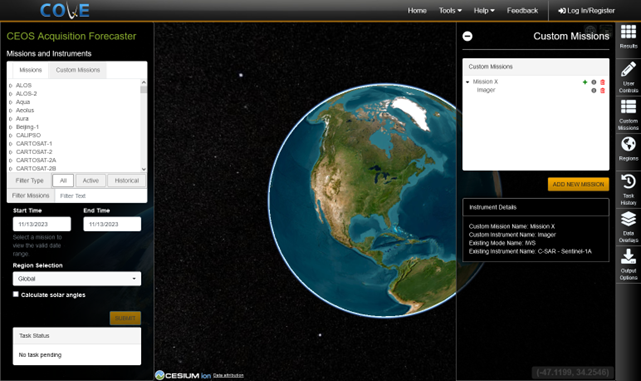
To create a new Custom Mission, users will select the Add New Mission button at the bottom of the Custom Mission panel. Once a mission has been created, users may add additional instruments. Selecting the + icon next to the mission will enable users to create an instrument for the mission. Clicking on that button will allow users to either add a new instrument. A detailed description of each process is provided below.
Creating a Mission
After clicking on the Add New Mission button, users are presented with the option to use an existing missions orbit or custom defined orbit. To make a selection, users may click on the radial button at the left edge of tab. The specifics of each selection are discussed below.
Selecting an existing missions orbit
When this option is selected, users are required to select a mission from the COVE database and provide a new name for the mission. After the selections have been made, users can save the mission by selecting the Save button.

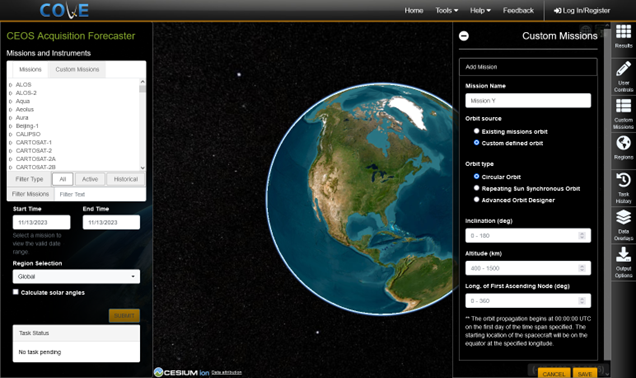
Creating a custom defined orbit
When this option is selected, users must specify the name of the new mission and select one of three methods for determining the orbit of the mission. The three methods vary in complexity and are designed to offer helpful functionality for the novice and complete control for the advanced user. The three methods are Circular Orbit, Repeating Sun-Synchronous Orbit, and Advanced Orbit Designer. All orbital elements must be provided in the J2000 reference frame and failure to use the proper reference frame may have significant negative consequences on the usefulness of any COVE analysis using the mission.
Circular Orbit
This method represents the most simplistic orbit definition. Users are required to provide the orbit altitude, inclination, and the longitude of the first ascending node. The altitude is specified as the mean orbit height (in km) above the equatorial radius of the Earth. The inclination is specified in degrees and represents the orientation of the orbit plane relative to the J2000 X-Y plane. The longitude is also specified in degrees and defines where on the Earth the orbit propagation is to begin.
To reduce complexity for the novice users, the other orbital parameters (argument of perigee, true anomaly, and eccentricity) are hidden and use pre-defined values. For circular orbits, the eccentricity is always equal to 0 and the argument of perigee is an undefined value as a unique point does not exist within the orbit. To address this issue, COVE arbitrarily sets the value to be 0 which when coupled with a true anomaly value of 0 forces the orbit propagation to always start at the equator.
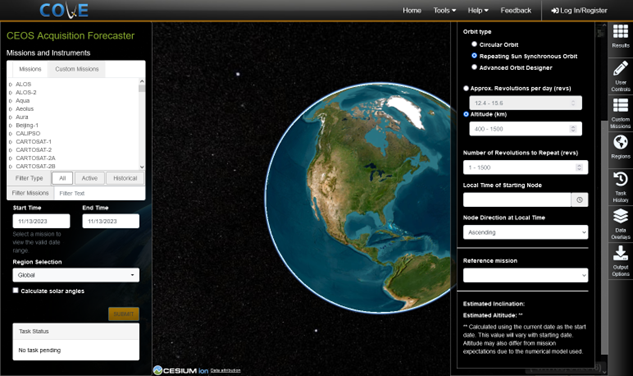
Repeating Sun Synchronous Orbit
This method is used to calculate the orbital parameters that define a repeating sun-synchronous orbit from a set of orbit design criteria that is provided by users. Users are required to provide information on the orbit altitude, the number of orbits in the repeat cycle, the location on the Earth where the orbit propagation is to begin, and the local time of either the ascending or descending node. This type of orbit is sub-class of the basic circular orbit discussed above and is subject to the same limitations with the addition of the limitation RAAN is defined as 0 at UTC.
For altitude, users can either input the initial guess at altitude directly or through the provision of the number of orbits that the satellite completes in a single day. Like the circular orbit option, the altitude is expressed as the mean orbit height above the Earth's equatorial radius. The revolutions to repeat parameter defines how long it takes the satellite to return to the same point on the Earth's surface. The longitude of the first ascending node defines where on the Earth's equator the orbit propagation begins and is specified in degrees. The local time of the ascending/descending node (LTAN/LTDN) is specified as the mean solar time at the equator when the satellite crosses during either the ascending or descending pass, whichever has been specified. The time should be expressed in the 24-hour system with the format restricted to HH:MM.
Several reference missions have been defined for users and can be accessed from the drop down below the user input fields. Use of a reference mission will create a new orbit that has the same repeat pattern as the original, but the specific daily performance will differ from the original due to the update made to the initial conditions of the orbit and the differences between COVE's generated TLE and general numerical propagation routines.
After all necessary inputs have been supplied, an estimate of the inclination and altitude of the calculated orbit will be displayed. These values are intended to provide users with a sanity check to ensure that the returned values are similar to the expected results and most likely will not match the actual orbit parameters of the true mission. The background calculations are attempting to determine the orbit parameters which will produce a repeating orbit under the propagation assumptions being utilized by the COVE tool which do not account for all effects acting on an actual satellite. If the returned altitude is not close to the expected value, users should adjust the altitude input and redo the calculation. The methodology for determining the altitude does not necessarily have a single unique solution and by changing the initial starting point, the algorithm may converge on a different solution.
The altitude and inclination values provided to users are based on the current date and are given as an estimate due to the potential for the solution to vary slightly with time. Due to the user specification of the local time and the starting longitude of the propagation, this orbit method has to determine the initial orbital elements each time users wish to change the analysis start date. The estimated values are displayed in order avoid the case where the epoch, or orbit starting time, is significantly far away from the requested analysis start date which would result in a long propagation to determine the orbit state at the start of the analysis thereby making the system less responsive to users and potentially reducing the accuracy of the results due to buildup of numerical precision errors. This methodology also has an impact on the starting time of the propagation. Normally, COVE propagations begin at the start of the day (00:00:00 UTC), but for this method, the start of the propagation is determined by using the combination of the mean local time and starting longitude to determine the starting time in UTC.
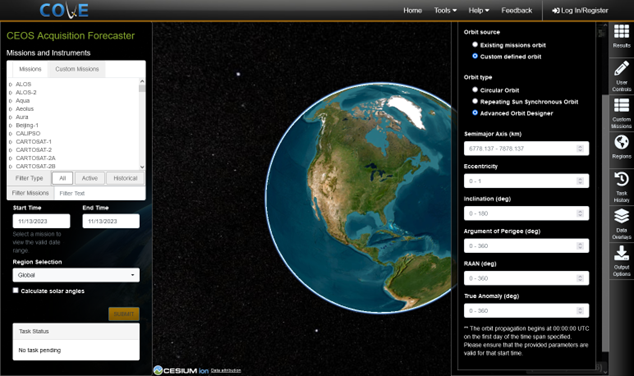
Advanced Orbit Designer
This method is intended to provide full control over the orbital elements of the mission orbit and should only be used by users who are familiar with orbital mechanics or who already have the necessary orbital elements. Users must provide the value of each of the six orbital elements as shown in the figure below.
NOTE: Due to computational constraints, the COVE tool is limited in the complexity of the force model that can be used during the numerical propagation of the satellite orbits. A reduced gravity model (degree 2, rank 0) which accounts only for the first order J2 term is used and all other sources of perturbation that would normally affect a satellite's orbit (solar and lunar gravity effects, drag, and solar radiation pressure) are neglected. b*drag in Custom Missions is defined as 20000-0.
Creating an instrument and operating mode
After users have saved a custom mission, users should click on the + icon next to the mission name in the missions list in the Custom Missions panel to create an instrument for the mission. There users are presented with the option to select from: Existing Instrument and Mode or Custom Instrument.
Selecting an existing instrument and operating mode
When this option is selected, users are provided with a list of instruments and their associated modes to select from. Begin by providing a name for the instrument and the operating mode that is being defined. After an instrument has been selected, COVE will calculate the estimated size of the instrument's ground swath using either the reference altitude (if an existing mission was selected) or the user provided altitude (if a new mission was created) and display the result to users. Clicking the "Save" button saves the custom instrument and makes it available to users for use within COVE.
existing mission
Creating a custom instrument/additional instruments
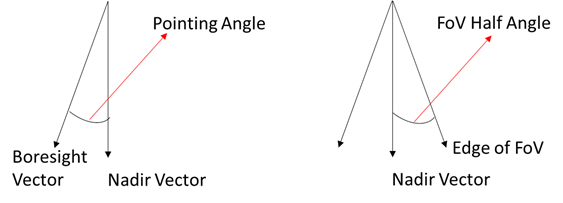
When this option is selected, users are prompted to specify the field of view and pointing angle of the operating mode and provide the name of the instrument being defined. Users are prompted to provide the field of view and pointing orientation of the instrument.

The field of view is defined as the angle between the vector connecting the instrument and the center of the ground swath and the vector connecting the instrument and the outer edge of the swath. The field of view is then oriented by the pointing angle which represents the amount of rotation (away from nadir) that has been applied to the instrument boresight. Both the field of view and the pointing angle are specified in degrees. Diagrams are provided below to illustrate how to determine the field of view and pointing angles.
Using user created mission/instrument combinations
Once a mission and instrument combination has been created, it is available for use in COVE in the Acquisition Forecaster, and Revisits Calculator tools. To utilize any of the user defined missions and instruments, users select the Custom Missions tab from the Missions and Instruments panel.